The other day we were adding words to our math journal... As we were adding them I was also reviewing old words. Copying down definitions is so very boring, but very much needed. So what do you do to make it a little less boring? Reward with treats! YUMMY!
You can use anything to reward. I was using Reeces Pieces (and before you say anything, I am aware of all allergies in my room and we are NOT a peanut free school). I was giving one piece to each participating student with the right answer. Man did that turn the lesson around quickly! They were VERY excited.
You could probably do this with erasers (the fun ones) or stickers too.
Showing posts with label Third grade. Show all posts
Showing posts with label Third grade. Show all posts
Sunday, November 20, 2011
Saturday, November 19, 2011
Eight year olds gone WILD!
Have you ever had those days when you know that little to no teaching is going to get done? Friday was one of those days. It was the last day before a week break (which includes Thanksgiving). The children knew they had earned a movie day (Charlie Brown Thanksgiving). My student teacher brought in popcorn to teach a lesson on scarcity. We had an assembly and a prayer service. It was cold and the kids were convinced it was going to snow (it didn't).
It was also someone's bday and she brought in huge homemade chocolate cupcakes (so good!).
We actually manged to get through everything except math (which was a lesson on arrays using jellybeans-I wasn't going to go there).
The last five minutes was utter madness. The birthday girl was blowing up a balloon someone gave her and letting it go. The remaining children (the bussers leave earlier) were screaming and chasing the balloon around the room. One girl (my "golden child" lol) was sitting at her desk looking like she was WAY too mature to be in that room. Watching them was like watching wild animals in their habitat. I felt like eight year olds on the wild should be a show on TLC.
Finally the bell rang and it was time to leave.
Did I mention I get a week off for Thanksgiving? I am so very thankful!
Sunday, July 17, 2011
Reading a flow chart
In third grade we practice reading different types of diagrams and charts. One fun project we do is to make a flow chart. Here is how I did it:
1. Write up directions for different things (making mac and cheese, making a pb&j sandwich, make cookies, etc).
2. Mix up the order of the steps you need to take
3. Group your students into groups of twos or threes-make sure there is a set of different directions for each group)
4. The students are to cut their directions apart and put the strips in order. Check to see the order is correct before they can move on.
5. Glue the steps down in order across a piece of looooong paper. Number the steps and draw arrows from one step to the other.
6. Draw a picture for each direction strip
![]()
![]()
1. Write up directions for different things (making mac and cheese, making a pb&j sandwich, make cookies, etc).
2. Mix up the order of the steps you need to take
3. Group your students into groups of twos or threes-make sure there is a set of different directions for each group)
4. The students are to cut their directions apart and put the strips in order. Check to see the order is correct before they can move on.
5. Glue the steps down in order across a piece of looooong paper. Number the steps and draw arrows from one step to the other.
6. Draw a picture for each direction strip
Globes and decor
The ceiling of my room has a large beam that runs horizontally from one end to the other. This beam has hooks on either side of it. It is great for hanging decorations!
Before hanging decorations on your ceiling, check with your principal. Some schools have fire alarms on the ceiling and hanging things may interfere with seeing the alarm light.
One year my students made globes. It was a great review of the continents and was good for teaching how to work together. It also looked amazing when it was done.
All you need are balloons, newspaper strips, and paper mache paste (1 part flour 2 parts water). Dip the stips into the paste and place on balloon, overlapping as much as possible. Let dry. Once it's dry, stick it with a needle to pop the balloon. The children then paint the globe.
Hang using a paper clip and clear string.
![]()
I also made a huge banner to hang with the globes that read "In the Beginning He Created the Heavens and the Earth".
Before hanging decorations on your ceiling, check with your principal. Some schools have fire alarms on the ceiling and hanging things may interfere with seeing the alarm light.
One year my students made globes. It was a great review of the continents and was good for teaching how to work together. It also looked amazing when it was done.
All you need are balloons, newspaper strips, and paper mache paste (1 part flour 2 parts water). Dip the stips into the paste and place on balloon, overlapping as much as possible. Let dry. Once it's dry, stick it with a needle to pop the balloon. The children then paint the globe.
Hang using a paper clip and clear string.

Layers of the Earth
Part of our science curriculum deals with the layers of the earth (crust, mantle, core)
What better way to learn this than to make Earth models?
What you need to do:
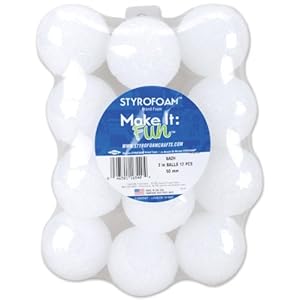
1. Buy small styrofoam balls like this:
2. Cut out a small cross section by using a straight edge razor. Cut halfway down (vertically) then halfway through (horizontally)-SEE PICTURES BELOW
3. Use wooden skewers so your students have something to hold while painting. They should paint the water first then let it dry (blue). Next paint the continents (green-free hand-doesn't have to be perfect). Finally they should paint the core (yellow) and around the core the mantle (red).
We had these on display for our Open House and they were a big hit!
What better way to learn this than to make Earth models?
What you need to do:
1. Buy small styrofoam balls like this:
2. Cut out a small cross section by using a straight edge razor. Cut halfway down (vertically) then halfway through (horizontally)-SEE PICTURES BELOW
3. Use wooden skewers so your students have something to hold while painting. They should paint the water first then let it dry (blue). Next paint the continents (green-free hand-doesn't have to be perfect). Finally they should paint the core (yellow) and around the core the mantle (red).
We had these on display for our Open House and they were a big hit!
| You can see the notch where I cut the cross section for the core and mantle |
| Painting the core and mantle |
| The continents |
Ordering large numbers
When my students come to me, they aren't expected to read numbers over the thousands place. It is my job to get them to read numbers up to the millions place (and decimals to the thousandths, but more to come on that later).
A good way to review this (and have some quiet time) is to write numbers from the hundreds up to the millions on pieces of paper. Hand one out to each student (I give the smaller numbers to students who are struggling-but they don't know this obviously).
They are to line up in front of the room from smallest to largest (or the other way-that doesn't matter) without speaking. If they speak, they are "out". If they aren't in the right order, you just tell them something is wrong, but don't point out who it is. Have them keep trying until they are correct. Once they are in order, each person takes a turn reading his or her number. Do this several times, each time giving the student a new number to line up with and read.
Fossils
Part of our science curriculum focuses on how scienctists date fossils. We learn that the deeper down the fossil is, the older it is.
To drive this point home, we do a little digging of our own. The students bring in three small objects from home (a penny, a dime, a button, a bean, etc). It has to be small and all three objects different. I tell them that these are going to be put in sand and glue, so they know not to bring something that is special to them.
On the first day I give each student three cups (use small cups-like the Dixie bathroom kind); one empty, one filled with sand, and another with two or three tablespoons of water. They should have a piece of paper numbered 1-3. They need glue (the bottle kind) and a spoon. I have them squeeze about a teaspoon of glue into their water and mix it well.
Then I have them fill the empty cup with a fourth of sand. Then put an object in.
Stop there and write the object down next to the number one.
Then another fourth sand and an object. Stop to write that object down next to the number two... And so on until all objects are buried. Lastly, dump the glue water into the cup.
After they are done they should let their cups sit to dry (put their paper under their cup). During your next science lesson, bring the cups out again and have them switch with a partner. The children are going to use plastic knives or butter knives to dig. As they find each object, they should write it down on their partners paper, next to their list. If this is done correctly it should look like this:
1. dime 1. button
2. penny 2. penny
3. button 3. dime
The children can see that the LAST object they found was really the FIRST object their partner buried.
Some helpful tips:
The first year I did this I used too much water and too much glue. The sand was rock hard and very hard to dig in.
The first year I did this our cups were too big. The next year I used much smaller cups.
You might want to try this first so it works for the cups you are using. You don't want it super easy to dig, but you don't want it impossible either. It should be fun for the students, not frustrating.
To drive this point home, we do a little digging of our own. The students bring in three small objects from home (a penny, a dime, a button, a bean, etc). It has to be small and all three objects different. I tell them that these are going to be put in sand and glue, so they know not to bring something that is special to them.
On the first day I give each student three cups (use small cups-like the Dixie bathroom kind); one empty, one filled with sand, and another with two or three tablespoons of water. They should have a piece of paper numbered 1-3. They need glue (the bottle kind) and a spoon. I have them squeeze about a teaspoon of glue into their water and mix it well.
Then I have them fill the empty cup with a fourth of sand. Then put an object in.
Stop there and write the object down next to the number one.
Then another fourth sand and an object. Stop to write that object down next to the number two... And so on until all objects are buried. Lastly, dump the glue water into the cup.
After they are done they should let their cups sit to dry (put their paper under their cup). During your next science lesson, bring the cups out again and have them switch with a partner. The children are going to use plastic knives or butter knives to dig. As they find each object, they should write it down on their partners paper, next to their list. If this is done correctly it should look like this:
1. dime 1. button
2. penny 2. penny
3. button 3. dime
The children can see that the LAST object they found was really the FIRST object their partner buried.
| My first year doing this activity-learned from my mistakes |
Some helpful tips:
The first year I did this I used too much water and too much glue. The sand was rock hard and very hard to dig in.
The first year I did this our cups were too big. The next year I used much smaller cups.
You might want to try this first so it works for the cups you are using. You don't want it super easy to dig, but you don't want it impossible either. It should be fun for the students, not frustrating.
Westward movement
A big part of 3rd grade is learning about the movement westward and how it expanded the amount of land we owned.
We discuss all the reasons why people were moving (to explore, to have more land, to find gold, etc). Then we map out the different trails explorers took.
To do this I blow up a map of the United States. I give each student a clump of clay. The clay is used to make mountains. They do this part first. Then they use their books and their markers to draw out the paths taken. Have them use a different color for each trail and add it to their legend. Most of the time you will hear complaints about it being hard to draw the trail because the mountain is in the way.
This is when I tell them how hard it must have been to get around the mountains on their wagons.
This project is a lot of fun because it teaches states, direction, landforms, and helps them understand how hard the trip must have been.
![]()
We discuss all the reasons why people were moving (to explore, to have more land, to find gold, etc). Then we map out the different trails explorers took.
To do this I blow up a map of the United States. I give each student a clump of clay. The clay is used to make mountains. They do this part first. Then they use their books and their markers to draw out the paths taken. Have them use a different color for each trail and add it to their legend. Most of the time you will hear complaints about it being hard to draw the trail because the mountain is in the way.
This is when I tell them how hard it must have been to get around the mountains on their wagons.
This project is a lot of fun because it teaches states, direction, landforms, and helps them understand how hard the trip must have been.
Area and perimeter
When we first learn about area, we count squares inside an object. It isn't until later that I teach them length times width. Of course, my advanced students see this relation right away. I let them figure out area by using multiplication.
One assignment is to use pattern blocks to fill in rectangles. They count how many pattern blocks it took to fill the rectangle.
![]() After they understand that area is the space inside, we learn about perimeter. I explain the perimeter is the FENCE that goes around and the area is the GRASS INSIDE the playground (see my post about singing for the lyrics to the area/perimeter song).
After they understand that area is the space inside, we learn about perimeter. I explain the perimeter is the FENCE that goes around and the area is the GRASS INSIDE the playground (see my post about singing for the lyrics to the area/perimeter song).
Once they are correctly finding area and perimeter we do a lesson on Chez-It math. It is really fun! Divide the class into groups and give each group a baggie filled with cheese crackers (about 30 crackers per baggie-have a couple students help you fill the baggies prior to the lesson). Call out the areas and perimeters you want them to find (show me a square with an area of 16 units-what is the perimetere, show me a rectangle with an area of 12 units-what is the perimeter, show me a rectangle with a perimeter of 14 units- what is the area?)
Let the students walk around to see how there are several correct ways to get the answer.
![]()
One assignment is to use pattern blocks to fill in rectangles. They count how many pattern blocks it took to fill the rectangle.
Once they are correctly finding area and perimeter we do a lesson on Chez-It math. It is really fun! Divide the class into groups and give each group a baggie filled with cheese crackers (about 30 crackers per baggie-have a couple students help you fill the baggies prior to the lesson). Call out the areas and perimeters you want them to find (show me a square with an area of 16 units-what is the perimetere, show me a rectangle with an area of 12 units-what is the perimeter, show me a rectangle with a perimeter of 14 units- what is the area?)
Let the students walk around to see how there are several correct ways to get the answer.
Measurement
Before we learn to use a ruler, we must understand WHY we use rulers. Why not just measure with whatever you have lying around?
For this lesson, I tell the students we are going to be learning about standard units of measure. For homework they are to bring in an object from home.
During the math lesson I assign about five things in the classroom to measure. Their desk, my desk, the bookcase, the blackboard, my file cabinet, etc. Before the lesson started, I use my object to measure the width of the doorway (I let them see me do this)
They record how many of their objects wide or tall it was. While they are measuring, I am walking around to assist. Then we come back together.
![]()
I write on the board how wide the doorway was
Doorway: 8 units
I ask them how wide their objects were and record a few answers
Teacher desk: 10 units, 3 units, 34 units.
I ask them if the desk could fit through the door if the door is 8 units and the desk is 10 units (no way!).
This gets us to talking about why it's important that we are all using the same units to measure. If my cabinet maker is leaving space for my dishwasher, he and the dishwasher maker need to have the same measurements so it fits properly. If the cabinet maker is using his cellphone to measure the space, and the dishwasher maker is using his guitar to measure the washer, we are going to have a problem.
For this lesson, I tell the students we are going to be learning about standard units of measure. For homework they are to bring in an object from home.
During the math lesson I assign about five things in the classroom to measure. Their desk, my desk, the bookcase, the blackboard, my file cabinet, etc. Before the lesson started, I use my object to measure the width of the doorway (I let them see me do this)
They record how many of their objects wide or tall it was. While they are measuring, I am walking around to assist. Then we come back together.
I write on the board how wide the doorway was
Doorway: 8 units
I ask them how wide their objects were and record a few answers
Teacher desk: 10 units, 3 units, 34 units.
I ask them if the desk could fit through the door if the door is 8 units and the desk is 10 units (no way!).
This gets us to talking about why it's important that we are all using the same units to measure. If my cabinet maker is leaving space for my dishwasher, he and the dishwasher maker need to have the same measurements so it fits properly. If the cabinet maker is using his cellphone to measure the space, and the dishwasher maker is using his guitar to measure the washer, we are going to have a problem.
Using a ruler
I hate using rulers. Really, I do. The lines are tiny and hard to see. Some students rulers are in eighths, some in sixteenths, some even smaller than that. Some students still confuse inches and centimeters. Some students see "mm" on the centimeter side and think their ruler doesn't have centimeters. It can be a nightmare.
Now that I've had plenty of time to teach measurement, I'm starting to get the hang of it! So if you struggle with it, I hope this post helps you!
First things first... I find a ruler clip art and blow it up, from the one inch mark to the two inch mark. That one inch takes up the entire paper, just to give you an idea of how big I make it. If you can, print it on cardstock. Get one copy for yourself and make it on an overhead transparency.
Pass out the blown up inch and tell the students (and tell them again, and again) that this really isn't an inch. Explain that an inch is very tiny. Have them look at what an inch is. Draw an inch line segment on the overhead. Explain you wanted to blow it up so they can see all the tiny marks.
We measure up to sixteenths, so make sure your ruler is divdied that way. If a student's ruler is NOT in the sixteenths, let them borrow one of yours.
As a class, label the blown up inch. As you label yours, they should label theirs. Have them keep it in their math folder. As they practice measurement, have them take it out to use. I have them measure the line segment on their worksheet, count the number of lines on their ruler, then count the same number on their blown up inch.
This website is great for measurement worksheets for homework.
http://themathworksheetsite.com/
Tuesday, July 12, 2011
Monthly Take Home Projects
In the past, depending on my class, I sometimes do monthly projects on top of book reports. Much like the book reports, I send home a letter explaining the directions and assign a due date a few weeks before the projects are due. Here is a list I worked from about two years ago:
August Make You Own Name Tag (done in class on the first day)
September Design a house for the fourth little pig
October Make a money timeline (find coins with years related to life events)
November Dress the turkey
December Gingerbread house (done in class)
January NONE
February Design a box for you Valentines (done in class-students bring in box)
March Make a Leprechaun Trap
April Passports
May Passports
June NONE
Passports will be explained later in this blog. It is a super fun project and the only one I repeat year to year.
Book Reports
Third grade is the first time my students complete book reports. I really didn’t know what I was doing my first year and didn’t assign a genre or project. Instead I handed out a list of ideas and the students were to pick from that list. I learned quickly that the following year I had to assign a genre and project. I think it’s important to assign the genre because children will keep reading the genre that interests them. They will never go outside the “box” to read something different. I try to get our public librarian in to read to us and bring books that go with that month’s genre.
Here is an example of the list I hand out at the start of the year. I also send home a letter explaining what to do and assign the due date about four weeks before the report is due. I do NOT keep the list the same each year. I would get very bored with seeing the same projects over and over.
September Sandwich Book Report-any genre
October Skelton Book Report-horror/scary book
November Newberry Award Winner Poster
December NONE
January Biography Time Line
February Tall Tale Report
March Historical Brochure
April Math Month Math Hunt
May Fiction Windsock
June NONE
This is a letter I have sent home in the past
February Book Report
Genre: Biography
Needed Materials:
Six 3-by 5-inch index cards
Glue stick or double stick tape
Assembled book (done in class)
Real picture of the person you are reporting on
Directions:
Pick out a biography and have it approved by your teacher.
Assemble your book according to the directions given in class.
On each notecard, illustrate one picture showing something that happened in the life of your person. This must be done NEATLY and in COLOR.
Glue or tape the picture to a page in your book.
Under the picture, write a caption. Remember that this is done in cursive!
Present your finished album to the class.
Due Dates:
February 3: Have book picked out and approved by teacher
February 4: Book will be assembled in class
February 11: Have the first two pictures with captions completed. Have a real picture of your person for the cover of your photo album.
February 18: Have the next two pictures with captions completed
February 25: Have the last two pictures with captions completed
Landforms and Candy
When teaching my third graders about landforms I like to use candy. A week or so before the activity takes place I send a letter home asking certain students to bring in the items to make the lesson possible.
I do this for holiday parties as well. I divide my class list into 4 sections at the start of the year. The first section is for the Halloween party, the second for the landform activity, the third for our Christmas party, and the fourth for our Valentines’ party. That way each child has a chance to bring something in for a party and we don’t end up with too much sugary things (I assign what they are to bring in).
These are the candies I use and what they represent:
One box of graham crackers PLAINS
One bag of Hershey Kisses MOUNTAINS
One box of Dots HILLS
One box of Ritz Bits cracker sandwiches PLATUES
One bag of Pull and Peel Twizzlers RIVERS
BLUE Fruit by the Foot or Fruit Roll Up LAKES
This picture was the only one I can find and the graham cracker is broke!
Subscribe to:
Posts (Atom)