Part of our rock unit covers volcanoes. I have found this model to be something fun to have, but not needed. You can always draw a volcano on large chart paper and do a cutaway to show the inside.
I also have this book. If you teach about volcanoes, you should really get this book. It has amazing illustrations and it's well written. The children love it!
This week we'll be making a paper volcano model and will use model magic to make the magma and lava. I'll post pics and directions next week!
Showing posts with label Science. Show all posts
Showing posts with label Science. Show all posts
Friday, March 2, 2012
Types of Rocks
We are wrapping up a unit on rocks and minerals in my classroom. We had some really fun lab days when learning about the different types of rocks and how they are formed.
For sedimentary rocks we took different crayons shavings and placed them on pieces of foil. Then we folded the foil over and used our palms to apply pressure.
For metamorphic rocks we used peanut butter (no peanut allergies), chocolate chips, and marshmallows. We chopped everything up and mixed in the peanut butter. We then made balls out of it, placed them in cupcake liners and microwaved them.
For igneous we took a melted mixture and let it cool.
We have these awesome rock and mineral collection at school. They really help with learning about rocks and minerals. If you are going to start a rock/mineral unit, you should have a set of your own.
Thursday, February 9, 2012
Layers of Soil
I purchased this awesome rock/mineral unit from TpT. It's really a nice supplement to our existing curriculum.
As part of this unit, I decided to use some hands on activities to teach about the layers of soil. First we watched a video from Brainpopjr on soil.
I paused the video often to ask questions and to review key vocabulary-topsoil, subsoil, bedrock, humus, and decompose.
After that we went to the science lab, where I had plates at each station. Each station had mini marshmallows, Cheerios, Coco Krispies, and gummy worms. I asked the children to guess what each food represented in terms of the soil layers.
After that we used the food to make a soil layer model. The marshmallows on the bottom, topped with Cheerios, then Krispies, then a worm.
After that the kids wanted to eat it, so I allowed them to do so while they completed an exit slip-the had to draw and label each layer of the soil.
Easy and FUN!
Friday, September 9, 2011
Scientific Method
New teachers, old teachers... doesn't matter... if you are a teacher, you need to be a member of proteacher.com.
I have found great things on there. One being this sheet that my students use when conducting experiments.
http://www.proteacher.net/discussions/showthread.php?t=277258&highlight=scientific+method
You have to be a member in order to download the document, but membership is free.
In the begining of the year we do several small experiments that are very teacher led, from filling out the worksheet together to giving step by step directions.
After a few experiments done together, they are expected to conduct the experiments and fill in the worksheet on their own. They still have a set of directions to follow, but it is not as teacher directed as it was before.
So far we have done the gummy bear in water experiment and today we put seeds in a wet paper towel and some in a dry paper towel (both are in their own baggie and taped to the window). Very easy to conduct, very easy steps for the worksheet, but it's great practice and the kids love any kind of experiment.
A book on the matter (so cute!)
Monday, July 18, 2011
Science and the Young Learner II
Websites to find experiments:
http://www.easy-kids-science-experiments.com/kindergarten-science-experiments.html
http://www.buzzle.com/articles/kindergarten-science-experiments.html
http://www.education.com/activity/kindergarten/science/
http://www.parentingscience.com/kindergarten-science-activities-tracking-animals.html
http://www.kindergarten-lessons.com/preschool_science.html
http://www.first-school.ws/theme/science.htm
http://www.atozteacherstuff.com/Lesson_Plans/Science/__Preschool/index.shtml
http://thesnailstrail.blogspot.com/2009/02/no-child-left-inside.html
http://www.wbrschools.net/curriculum2/science/sk/01%20SCI_Kindergarten.pdf
Do you have any that aren't listed here? Please leave a comment and let us know about it!
Sunday, July 17, 2011
Globes and decor
The ceiling of my room has a large beam that runs horizontally from one end to the other. This beam has hooks on either side of it. It is great for hanging decorations!
Before hanging decorations on your ceiling, check with your principal. Some schools have fire alarms on the ceiling and hanging things may interfere with seeing the alarm light.
One year my students made globes. It was a great review of the continents and was good for teaching how to work together. It also looked amazing when it was done.
All you need are balloons, newspaper strips, and paper mache paste (1 part flour 2 parts water). Dip the stips into the paste and place on balloon, overlapping as much as possible. Let dry. Once it's dry, stick it with a needle to pop the balloon. The children then paint the globe.
Hang using a paper clip and clear string.
![]()
I also made a huge banner to hang with the globes that read "In the Beginning He Created the Heavens and the Earth".
Before hanging decorations on your ceiling, check with your principal. Some schools have fire alarms on the ceiling and hanging things may interfere with seeing the alarm light.
One year my students made globes. It was a great review of the continents and was good for teaching how to work together. It also looked amazing when it was done.
All you need are balloons, newspaper strips, and paper mache paste (1 part flour 2 parts water). Dip the stips into the paste and place on balloon, overlapping as much as possible. Let dry. Once it's dry, stick it with a needle to pop the balloon. The children then paint the globe.
Hang using a paper clip and clear string.

Layers of the Earth
Part of our science curriculum deals with the layers of the earth (crust, mantle, core)
What better way to learn this than to make Earth models?
What you need to do:
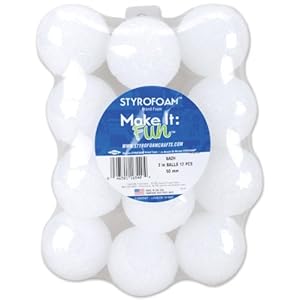
1. Buy small styrofoam balls like this:
2. Cut out a small cross section by using a straight edge razor. Cut halfway down (vertically) then halfway through (horizontally)-SEE PICTURES BELOW
3. Use wooden skewers so your students have something to hold while painting. They should paint the water first then let it dry (blue). Next paint the continents (green-free hand-doesn't have to be perfect). Finally they should paint the core (yellow) and around the core the mantle (red).
We had these on display for our Open House and they were a big hit!
What better way to learn this than to make Earth models?
What you need to do:
1. Buy small styrofoam balls like this:
2. Cut out a small cross section by using a straight edge razor. Cut halfway down (vertically) then halfway through (horizontally)-SEE PICTURES BELOW
3. Use wooden skewers so your students have something to hold while painting. They should paint the water first then let it dry (blue). Next paint the continents (green-free hand-doesn't have to be perfect). Finally they should paint the core (yellow) and around the core the mantle (red).
We had these on display for our Open House and they were a big hit!
| You can see the notch where I cut the cross section for the core and mantle |
| Painting the core and mantle |
| The continents |
Fossils
Part of our science curriculum focuses on how scienctists date fossils. We learn that the deeper down the fossil is, the older it is.
To drive this point home, we do a little digging of our own. The students bring in three small objects from home (a penny, a dime, a button, a bean, etc). It has to be small and all three objects different. I tell them that these are going to be put in sand and glue, so they know not to bring something that is special to them.
On the first day I give each student three cups (use small cups-like the Dixie bathroom kind); one empty, one filled with sand, and another with two or three tablespoons of water. They should have a piece of paper numbered 1-3. They need glue (the bottle kind) and a spoon. I have them squeeze about a teaspoon of glue into their water and mix it well.
Then I have them fill the empty cup with a fourth of sand. Then put an object in.
Stop there and write the object down next to the number one.
Then another fourth sand and an object. Stop to write that object down next to the number two... And so on until all objects are buried. Lastly, dump the glue water into the cup.
After they are done they should let their cups sit to dry (put their paper under their cup). During your next science lesson, bring the cups out again and have them switch with a partner. The children are going to use plastic knives or butter knives to dig. As they find each object, they should write it down on their partners paper, next to their list. If this is done correctly it should look like this:
1. dime 1. button
2. penny 2. penny
3. button 3. dime
The children can see that the LAST object they found was really the FIRST object their partner buried.
Some helpful tips:
The first year I did this I used too much water and too much glue. The sand was rock hard and very hard to dig in.
The first year I did this our cups were too big. The next year I used much smaller cups.
You might want to try this first so it works for the cups you are using. You don't want it super easy to dig, but you don't want it impossible either. It should be fun for the students, not frustrating.
To drive this point home, we do a little digging of our own. The students bring in three small objects from home (a penny, a dime, a button, a bean, etc). It has to be small and all three objects different. I tell them that these are going to be put in sand and glue, so they know not to bring something that is special to them.
On the first day I give each student three cups (use small cups-like the Dixie bathroom kind); one empty, one filled with sand, and another with two or three tablespoons of water. They should have a piece of paper numbered 1-3. They need glue (the bottle kind) and a spoon. I have them squeeze about a teaspoon of glue into their water and mix it well.
Then I have them fill the empty cup with a fourth of sand. Then put an object in.
Stop there and write the object down next to the number one.
Then another fourth sand and an object. Stop to write that object down next to the number two... And so on until all objects are buried. Lastly, dump the glue water into the cup.
After they are done they should let their cups sit to dry (put their paper under their cup). During your next science lesson, bring the cups out again and have them switch with a partner. The children are going to use plastic knives or butter knives to dig. As they find each object, they should write it down on their partners paper, next to their list. If this is done correctly it should look like this:
1. dime 1. button
2. penny 2. penny
3. button 3. dime
The children can see that the LAST object they found was really the FIRST object their partner buried.
| My first year doing this activity-learned from my mistakes |
Some helpful tips:
The first year I did this I used too much water and too much glue. The sand was rock hard and very hard to dig in.
The first year I did this our cups were too big. The next year I used much smaller cups.
You might want to try this first so it works for the cups you are using. You don't want it super easy to dig, but you don't want it impossible either. It should be fun for the students, not frustrating.
Wednesday, July 13, 2011
Science and the young learner
Your young learner should be given opportunities to explore their senses. In the past I have collected film canisters and added cotton balls to them. I then use oils, extracts, or perfumes to scent the cotton balls. I allow the child to smell what is inside and guess what it is. Then we record what we think and check later. You can also gather foods that cover all the taste senses and have them tell you which taste it falls under. My favorite was sour! It helps to have pictures of each taste so the kids can understand the word if they don't already (some kids may not understand bitter but understand that medicine can be bitter).
Let your young learner touch and explore. Many people are worried about the mess it will make, but it’s important to allow them to touch and feel things. Finger paint, squirt shaving cream all over your table, make gel bags for them to squeeze, make dough, make goo (http://littleshop.physics.colostate.edu/Try%20At%20Home/goorecipeone.htm). The messier the better. Use vivid words when you are discussing what it feels like.
Start having your young learner collect things from nature and describe them to you (the pinecone is brown, this rock is heavier than this rock, this stick looks like a Y). You can have them draw a picture and write about it. You should translate what they wrote under what they wrote.
Throw different tools in the sensory table. Have items to view with a magnifying glass. Have them draw a picture of what it looked like without the magnifying glass and another of it with the magnifying glass. Ask why people need to use magnifying glasses. Let them read a book using one. Let them stick thermometers in snow or water and record what they see. Ask why it went down when stuck in snow, but up when it was placed in boiling water (you obviously need to put it in the boiling water-but they can still look to see that the temp went up). Ask about other things that would cause the temp to go up or down.
By this age, your young learner should know if something is living or nonliving. Go outside and have them find things that are nonliving. Ask them why it’s nonliving. Do the same for living things. Gather pictures of living things and ask them to group them. What do these living things have in common? What is different? Once they know the difference between living and nonliving start to discuss the needs of living things. What is a need? What is a want? What happens if we don’t have something we need? What if we don’t have something we want? Gather pictures of needs and wants. Have your young learner put them in two piles by wants and needs. Make sure you discuss each item and why it’s a need or want.
One of the most favorite activities was using magnets. Place metal items on a table and place a magnet under. Show how the objects move. Show how you can pick metal items up with it. Show what happens if you try to pick up plastic or paper items. Why doesn’t it work? Hide metal items in sand and let them find it with the magnet.
Next, work on gravity. Stand on something stable and drop items. What happens if you drop a book and toy car at the same time? Have them feel each item and guess which will hit the floor first. Make a prediction and record it. Talk about the fact that scientists always make a guess as to what will happen first. After they guess, try it out. Were they right? Have them record what really happened.
Weather is a big part of preschool. After I did calendar I would always do weather. Keep a chart with pictures of the different kinds of weather. You can do it by the month or by the week. Compare today’s weather to yesterdays. Have a spot available to guess what tomorrow will be like. Talk about what you should wear in that kind of weather. You can show pictures of weather and have them draw people wearing the appropriate clothing.
This is just the beginning of science and your young learner. The world is your classroom. Go outside and use it!
Tuesday, July 12, 2011
Landforms and Candy
When teaching my third graders about landforms I like to use candy. A week or so before the activity takes place I send a letter home asking certain students to bring in the items to make the lesson possible.
I do this for holiday parties as well. I divide my class list into 4 sections at the start of the year. The first section is for the Halloween party, the second for the landform activity, the third for our Christmas party, and the fourth for our Valentines’ party. That way each child has a chance to bring something in for a party and we don’t end up with too much sugary things (I assign what they are to bring in).
These are the candies I use and what they represent:
One box of graham crackers PLAINS
One bag of Hershey Kisses MOUNTAINS
One box of Dots HILLS
One box of Ritz Bits cracker sandwiches PLATUES
One bag of Pull and Peel Twizzlers RIVERS
BLUE Fruit by the Foot or Fruit Roll Up LAKES
This picture was the only one I can find and the graham cracker is broke!
Subscribe to:
Posts (Atom)